9.1 Introduction to this chapter
This chapter provides a detailed introduction to various settings of the xCore control system.
9.2 Controller settings
9.2.1 Basic settings
9.2.1.1 System information

① |
Version: control system version information; |
② |
Robot type: robot model information; |
③ |
MAC address: local MAC address; |
④ |
Restart: Note that all configuration information should be saved before restarting; |
9.2.1.2 System configuration

① |
Robot type: Select the robot model; |
② |
Safeboard: Select the type of safeboard; |
③ |
Control cab type: Select the control cab type; |
Note: Please do not modify the system configuration. In special circumstances, adjustments should be made under the guidance of the manufacturer.
9.2.1.3 System time
The system time provides a time reference for functions such as log.

① |
Time value: controller time; //not refresh in real time |
② |
Obtain controller time: After clicking, refresh to display the controller time, and the user can confirm whether the value is reasonable; |
③ |
Set to current time: Update the controller system time to the current system time of the device where the RobotAssist software is located, without the need to click "OK" again. |
④ |
The user can manually modify the time in ①, and set the controller time after clicking "OK"; |
|
9.2.1.4 System IP properties
Configure the connection mode, IP, and subnet mask of the robot’s external network port on this page.
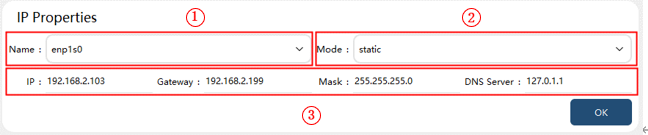
① |
Name: Display the automatically obtained network card name; |
② |
Mode: manual (IP can be changed) or automatic (IP is automatically assigned); |
③ |
IP, gateway, subnet mask, and DNS server; |
Note: The IP address of the debugging network port can only be modified to 192.168.0.160 or 169.254.160.160. When the IP of the debugging network port is 192.168.0.160, the IP of other network ports cannot be modified to the 192.168.0 network segment; when the IP of the debugging network port is 169.254.160.160, the IP of other network ports can be modified to the 192.168.0 network segment but not to 192.168.0.160.
9.2.2 Advanced settings
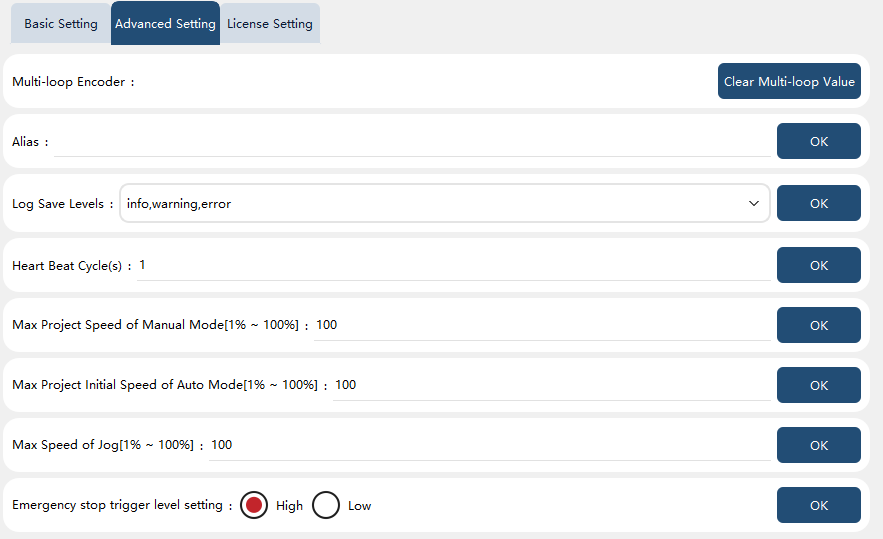
Multi loop encoding |
Clear the multi loop value of encoder. Be careful! |
Alias |
Set an alias for each controller, so that the robots in the same LAN can identify the controllers conveniently. The alias will be displayed on the "Options" -> "Connections" -> "Robot Detection" interface. |
Log save level |
There are three levels of log: "info", "warning", and "error", ranking from low to high. Set the level from which the log is kept. The log of lower levels will only be displayed online, and will not be kept in the log. |
Heartbeat cycle |
"One high level + one low level" is a heartbeat cycle, and the duration of high level is the same as that of low level. The heartbeat signal can be bound to the DO signal through the system IO (see the system IO part for details), or bound to the register through the "sta_heartbeat" (see the register part for details). |
Deviation path sphere radius |
Unit: mm. Range: Definition: Given a value x, when the robot pauses at point A, a sphere is formed with point A as the center and x as the radius. If the Euclidean distance between the robot’s current position and point A is less than x, the deviation path sphere radius condition is satisfied. This parameter is used in conjunction with the function code "sta_near_path". For details, refer to the register section. |
Deviation path orientation angle |
Unit: degrees (°). Range: Definition: Given a value a°, when the robot pauses at point B, using B’s orientation as the reference, the current robot position’s coordinate system is compared with B’s coordinate system. If the angular deviation between these two coordinate systems is less than a°, then the path deviation sphere angle condition is considered satisfied. This parameter is used in conjunction with the function code "sta_near_path". For details, refer to the register section. |
Upper limit of program speed in manual mode |
This parameter limits the upper limit that the program speed can be set when adjusting the program speed through the program speed slider and the "-/+" fine-tuning button in manual mode. Example: After setting this value to 20%, if it is currently in automatic mode and the program speed is 40%, the working mode will be switched from automatic mode to manual mode, and the program speed will be automatically set to 20%. When it is in automatic mode, the program speed is not affected by this parameter. Note: 1. When setting the program speed through the register function code (ctrl _ set _ program _ speed) or SDK, if the robot is in manual mode, the actual program speed will be limited by this parameter; if the robot is in automatic mode, the actual program speed is the set value of the register function code or SDK. 2. When the automatic mode is switched to the manual mode (the switching method includes: the mode switching button on the HMI, the register function code, the system IO, the external communication, and the SDK), the program speed will be limited by this parameter. |
Automatic mode program initial speed upper limit |
Through this parameter, the program can run in automatic mode at a relatively low speed (the value set by this parameter), enhancing the safety of the operation. After running, the user can adjust the program speed according to the actual situation. When the “Valid only on the first run after switching to automatic mode”, as an optional switch, is enabled, the program speed will be automatically adjusted to a lower preset speed only the first time you click "Run" after switching to automatic mode. In all other cases, the program will run at the speed set in the interface in automatic mode. Example: The parameter is set to 5%. If the current program speed is 60%, when the program is run in automatic mode, the program speed will be automatically adjusted to 5%; if the current program speed is 3%, the program speed will remain at 3% when running the program in automatic mode. This parameter is set to 5%, and the “Valid only on the first run after switching to automatic mode” is enabled. If the current program speed is 60%, after switching from manual mode to automatic mode, the program speed will be automatically adjusted to 5% on the first run. If the speed in automatic mode is changed to 60%, and the program is paused and then restarted, the program speed will remain at 60%. |
Default program running speed after startup |
When this option is enabled, the controller will set the program running speed to the configured default value upon reboot, ensuring a deterministic program running speed after each controller restart. This setting cannot exceed the manual mode speed limit or automatic mode speed limit. If the configured value exceeds these above limits, it will automatically be reduced to the corresponding limit value. |
Jog speed limit |
Robot Jog speed cannot be adjusted to a value greater than this upper limit. |
Emergency stop trigger level type setting |
Through this setting, it is determined whether the register, system output, and external communication output+state bits related to the emergency stop state are "high" or "low" after the emergency stop is triggered. |
9.2.3 Authorization settings
9.2.3.1 EtherCAT authorization

An authorization code is used to authorize the EtherCAT communication.
|
The robot cannot be powered on if the authorization code expires or the authorization fails. |
9.2.3.2 Function authorization
The xCore system supports some optional software functions, which are divided into two types:
1. Languages: Japanese, Korean, Russian, and English;
2. Process packages: PV inserting process package, PV typesetting process package, laser welding process package, and SDK secondary development interface;
To enable optional functions, you can purchase an authorization code file based on the list of function to be enabled.
Note: The authorization information is bound to the controller of the robot, one robot, one file.
Activation method: In "Settings"−"Controller settings"−"Authorization settings"−"Function authorization", click "Select file", and select authorization file for authorization. If the authorization is successful, restart RobotAssist according to the prompts to enable the optional functions.
Authorization validity: At present, the function authorization is permanently valid, and the controller version upgrade, configuration deletion, factory reset, etc. do not affect the authorization state.
Authorized functions: The functions that the current robot has authorized are displayed.

Associated content: In "HMI Settings"−"Basic Settings"−"Language", only authorized languages are displayed.

9.2.3.3 Lock license
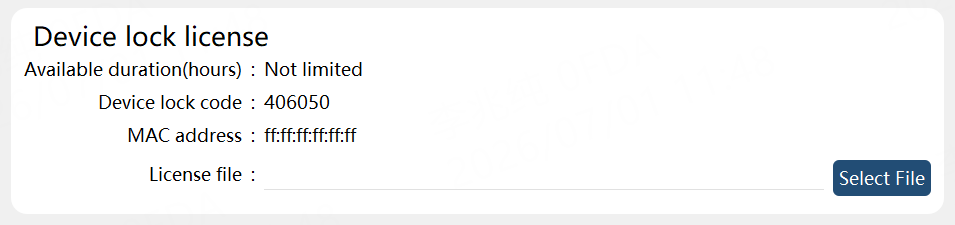
Remaining time (h): Display the current valid operating time available for the robot, in hours. If the robot was shipped without a license or with unlimited time, there will be "unlimited time."
Lock code: Display the current valid lock code for the lock license. This code is automatically updated after each licensing, and only the latest lock code is valid for each licensing.
MAC Address: Display the MAC address of the current machine.
Lock license procedure: Click the "Select file" button and choose the license file generated through "Settings" → "License generator" for lock license.
|
When the remaining time is less than 7 days, a pop-up message will appear upon each startup and daily at 12:00, stating: "Remaining trial time is less than one week. Please contact technical support to purchase a license for unlocking." However, this notification does not affect robot operation. When the remaining time reaches zero, the robot will be immediately powered down and stop operating. Upon each startup and power-on attempt, a pop-up message will appear stating: "License has expired. Please contact technical support to purchase a license for unlocking." At this time, the robot cannot be powered on. Controllers of robots with a time-limited lock license cannot be freely upgraded. If a non-designated version is used for upgrading, the upgrade process will be interrupted, and a pop-up message will appear stating: "The upgrade has failed. If an upgrade is required, please contact technical support to obtain the designated version upgrade package that supports the lock for upgrading and resolving issues." |