8.16.1 RL program format and syntax
8.16.1.1 Overview
The name suffix of RL language program file is .mod, and the mod is the abbreviation of module. For example: For MoveObj.mod or PickSomething.mod, each program file forms a program module.
RL language commands are not case-sensitive. For example, MoveAbsJ, moveabsj, and MOVEABSJ all can be recognized. However, in order to maintain a uniform language style, it is recommended to capitalize the initial letters.
8.16.1.2 Program structure
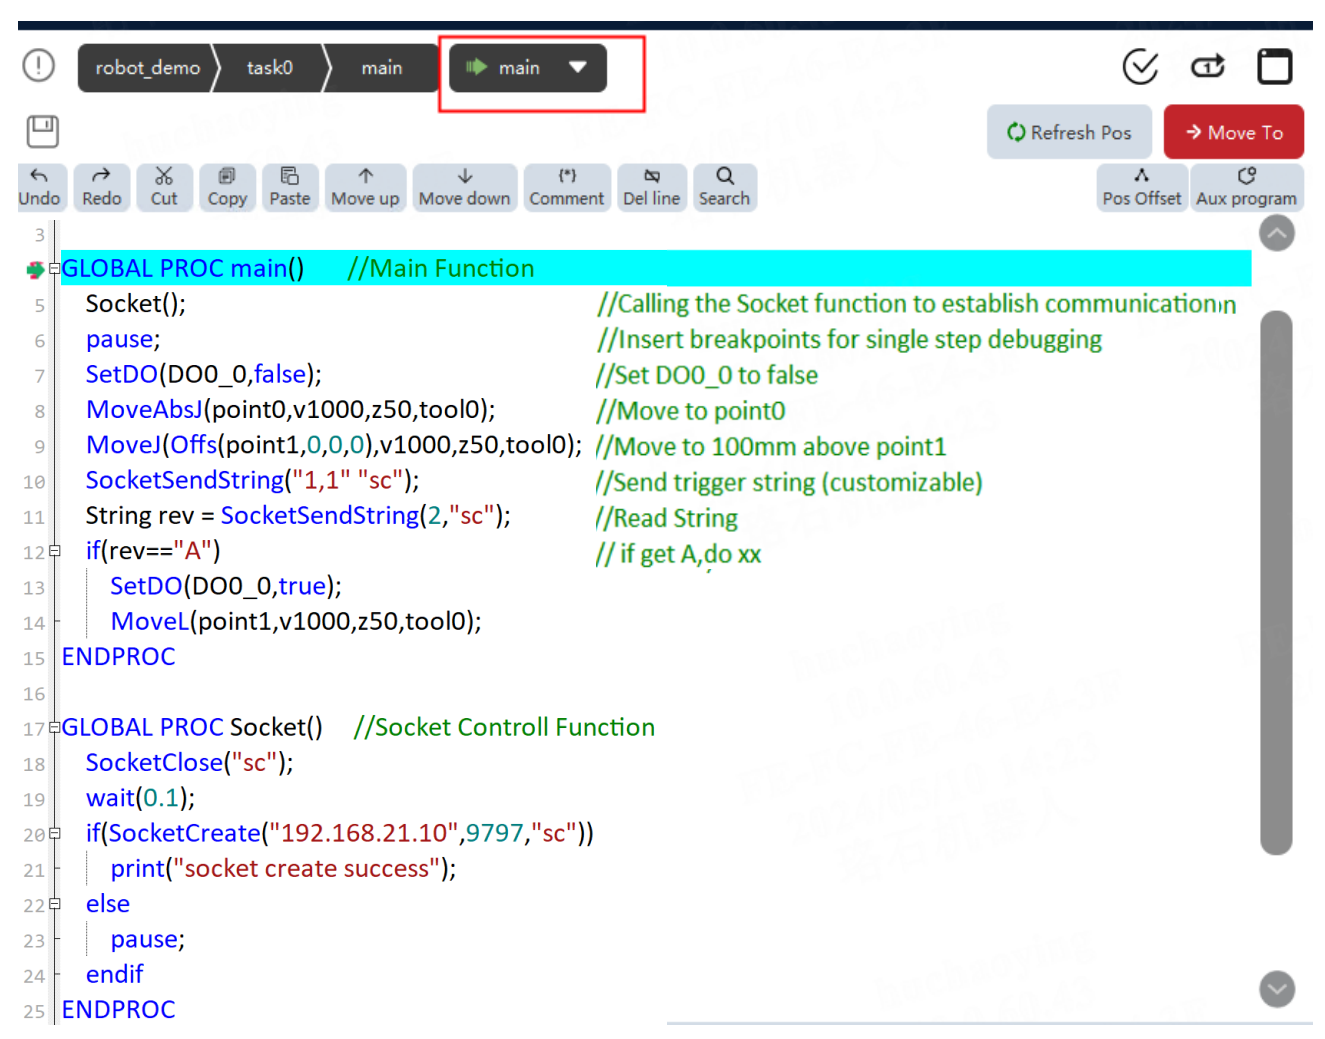
Here is a simple RL program:
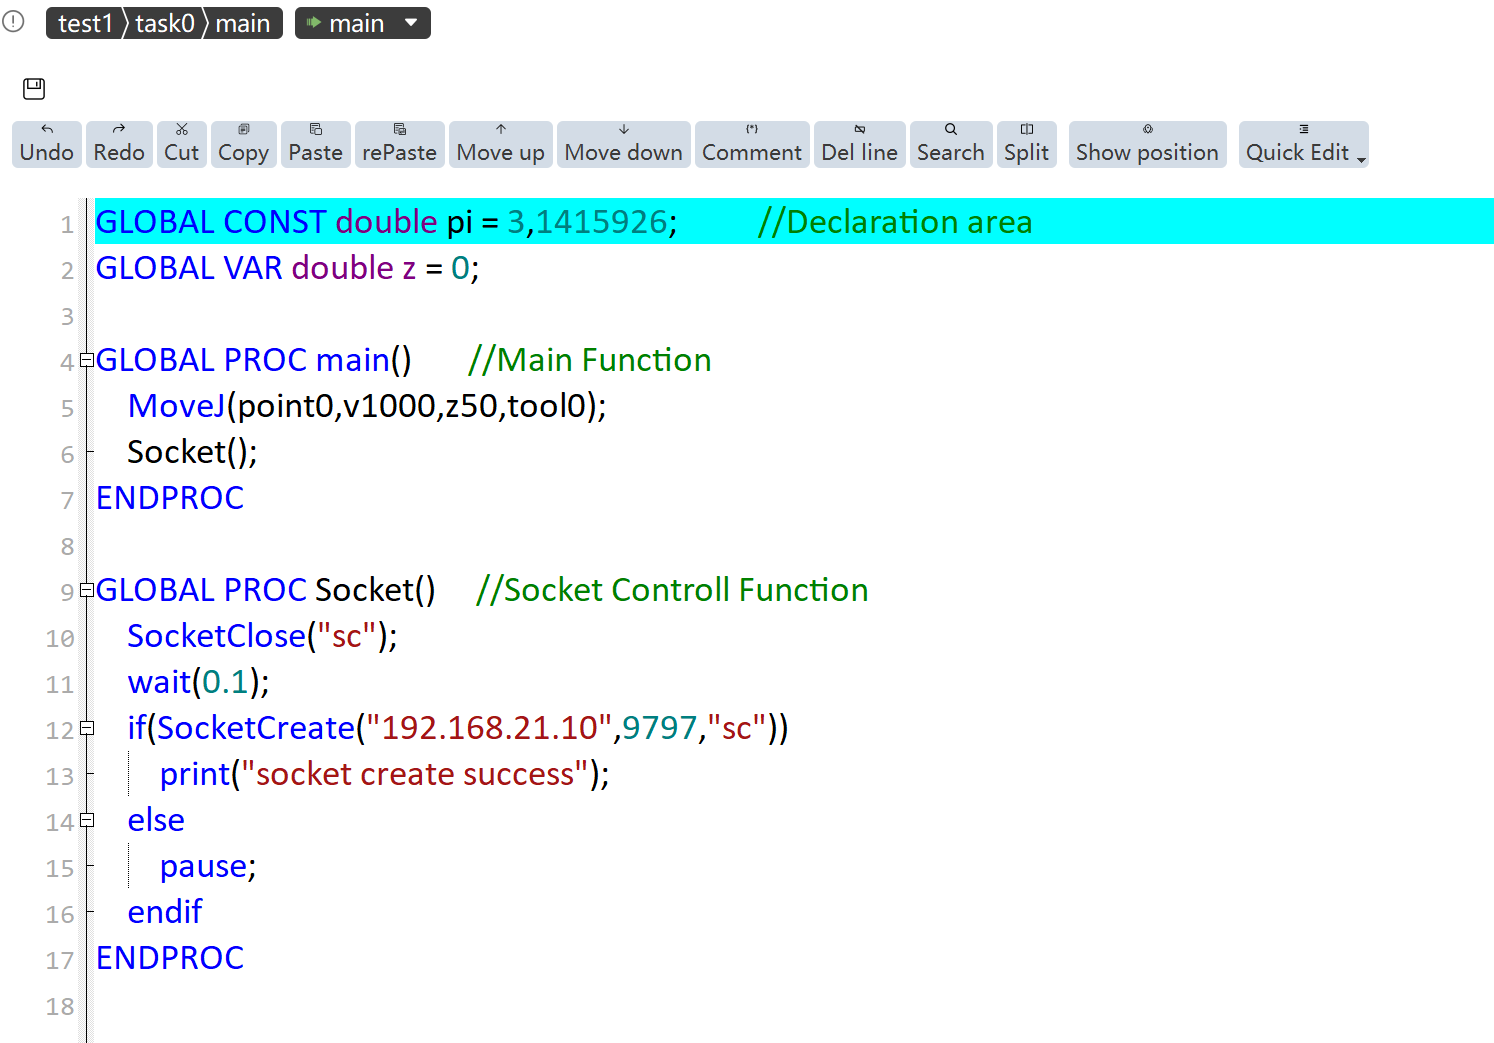
The entire program is divided into two major sections, the declaration area, and the implementation area. The area before the first function in each Mod file is the declaration area. For example, in main.mod, the part before GLOBAL PROC main is the declaration area. In the declaration area, variables or constants can be defined. The variables defined in this area will be reset to their initial values each time the program is executed.
VAR or CONST keyword represents storage type, with VAR indicating a variable and CONST declaring a constant. If a variable’s storage type is not explicitly declared, it defaults to being a VAR.
There are several differences between variables declared in the declaration area and those listed in the variable list:
When a certain task finishes running and is reset, the variables defined in the declaration area within the task will be reset;
The variables in the variable list, owned by the entire project, are the common variables. Non-PERS variables in the variable list are only reset upon execution of pptomain, and PERS variables can only be modified through the editing function in the variable list or by the RL program.
8.16.2 RL program debugging
8.16.2.1 Program pointer
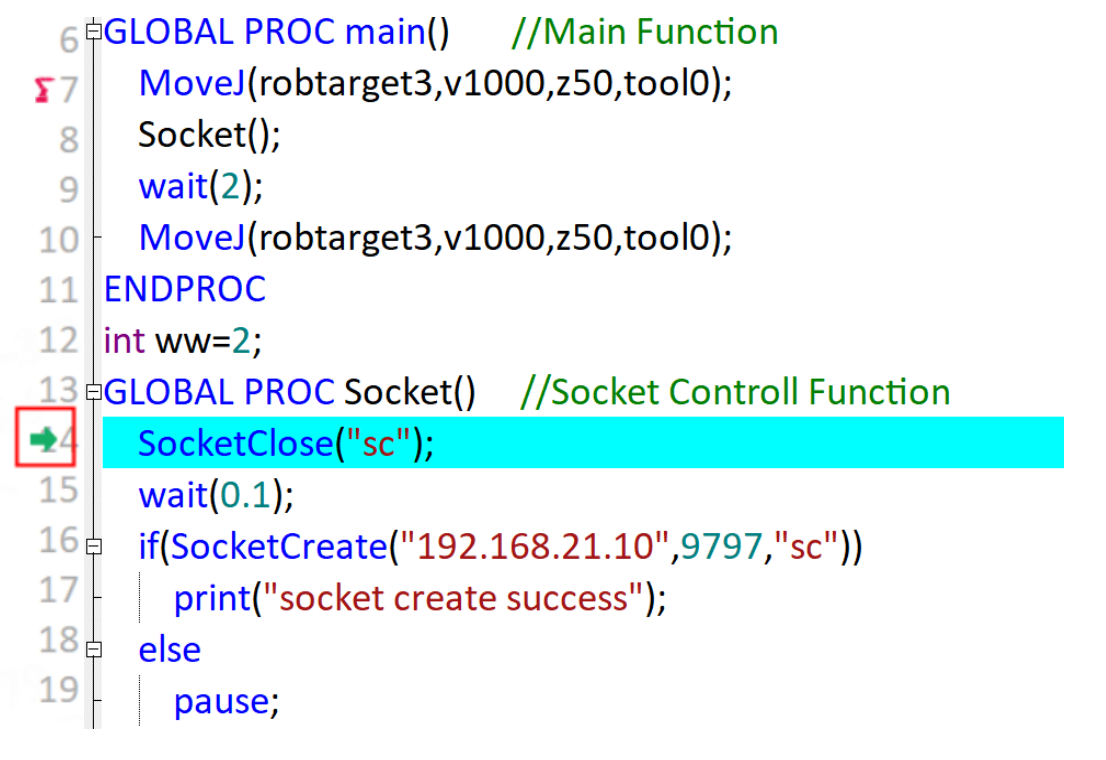
The program pointer points to the line that has been parsed and run by the program.
On the HMI interface, the program pointer is indicated by a small green arrow (also called the green pointer).
8.16.2.2 Motion pointer
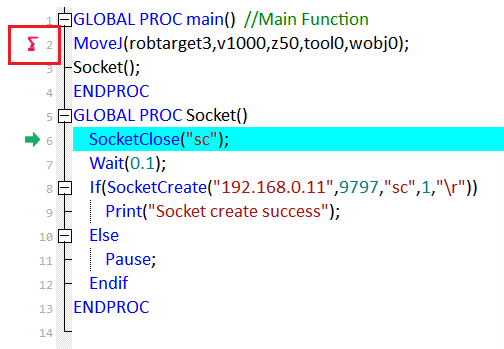
The motion pointer points to the current command the robot is executing;
On the HMI interface, the motion pointer is indicated by a red arrow.
8.16.2.3 Move program pointer
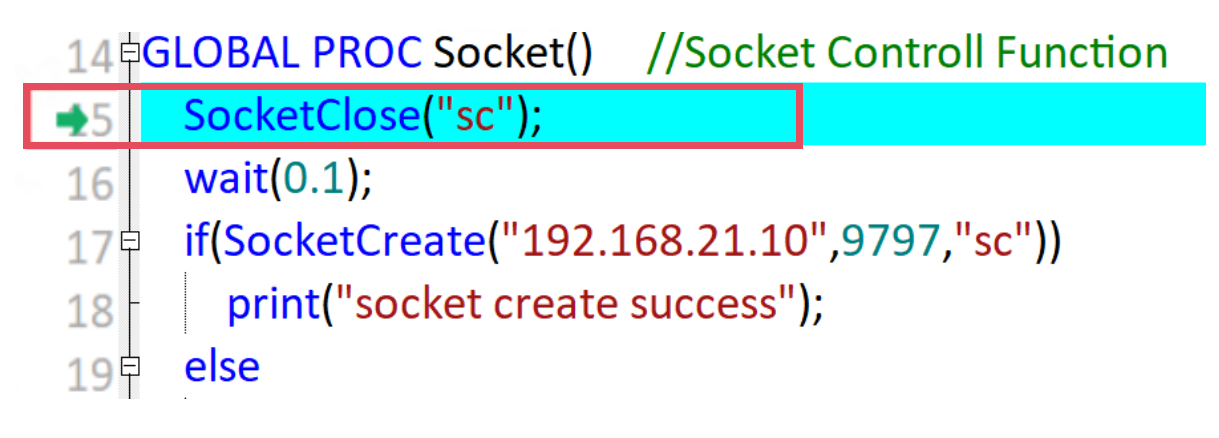
If you need to start the program after a line from the middle of the program, you can use this function to move the program pointer to the line where the cursor is, and then the program can be executed from a new position.
Operation |
Graphical Representation |
Explanation |
1. Click the "Stop" button on the right operation panel to pause the RL program. |
|
|
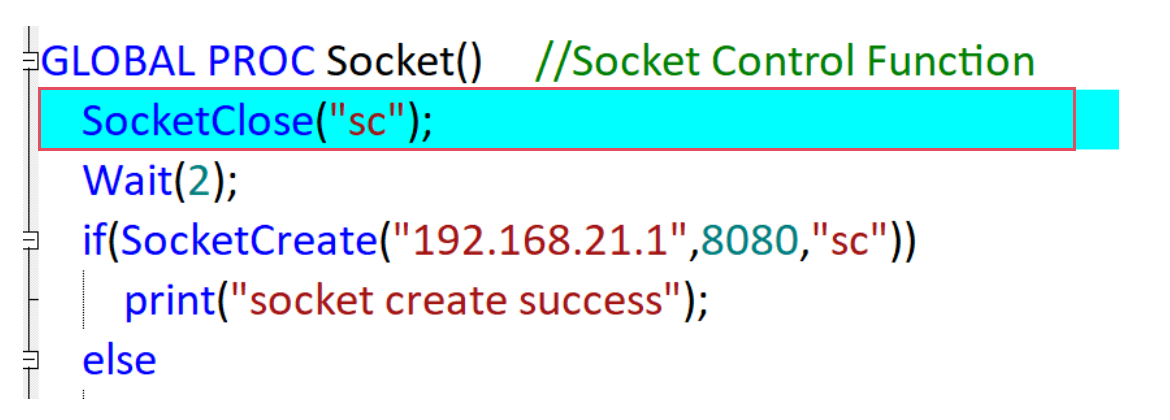
2. Click the line to which you expect the pointer to move to make it selected. |
|
The background color is light blue when selected. |
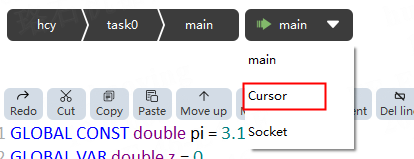
3. Click the drop-down arrow next to the Program Debug Quick Positioning button, and select "Cursor" from the list. |
|
After selection, this button displays the word "Cursor". |
4. Click the Program Debug Quick Positioning button to move the pointer to the selected line. |
|

Use restrictions:
1. When using this function, the following commands will be ignored, and the compiler’s compile position will be directly moved to the target line.
In addition, all other commands will not be executed:
-
All motion commands;
-
SetDO, SetGO, Return, Wait, Print, and all Socket commands;
-
Function call line;
2. The condition of the flow control command is ignored when moving the program pointer.
3. Do not move the program pointer across functions. It is necessary to first use the "program pointer to function" to move the program pointer to the beginning of a function, and then use the pointer function of a program.
4. The pointer of a program can only be moved to the motion command line.
8.16.2.4 Single-step debugging
The single-step operation status is also known as Single-step Mode, as against the Continuous Mode. The robot can switch between the two modes in most cases.
The single-step operation is mainly used for the program debug. The robot will try to execute one line of commands as much as possible each time it runs in a single step, and pause the program after the commands are completed, making it easy to confirm whether the teaching points of each line meet the requirements. When a multi-task project is being debugged, single-step debugging will only execute the tasks displayed on the HMI debugging interface, and the rest tasks will not be called.
If the single-step debugging executes read data commands (ReadDouble, ReadString, etc.), time-related commands (Wait, WaitUntil, etc.), and logic commands (IF, GOTO, etc.), it will take two to three clicks to complete the command due to the command characteristics.
Operation |
Graphical Representation |
Explanation |
1. Move the pointer to a certain line. |
|
|
2. Click the "Next" button on the right operation panel. |
|
|
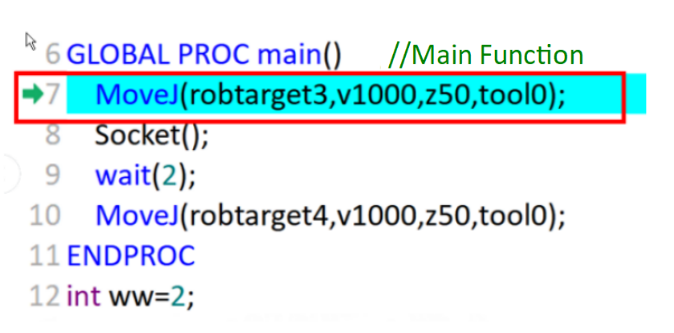
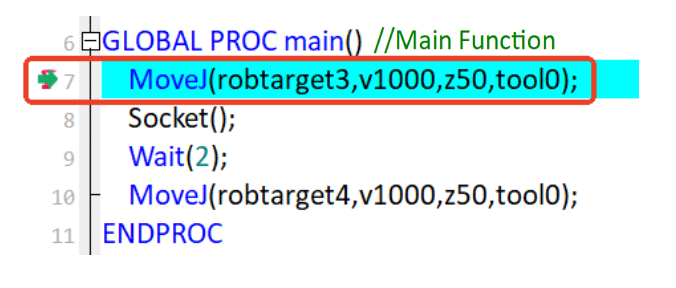
3. Click the "Next" button again, and you can see that the robot is executing the line. After completing the execution, click the "Next" button again to start the next step. |
|
If a function is encountered, it will jump to the inside of the function, and the executing line can be located through the program pointer (green arrow). |

Use restrictions:
1. In Continuous Mode where programs are executed automatically, and the turning zone should be processed, motion lookahead is available.
2. In Single-step Mode where commands are executed directly without processing the turning zone, motion lookahead is not available.
3. In Continuous Mode, motion only starts when there are enough lookahead points, and the system only continues to parse the command when the robot is in place.
4. In Single-step mode, all next-step signals are triggered by the interface, without turning zone processing and lookahead.
5. In Single-step Mode, no response is made when "Next" is clicked during motion.
6. In Continuous Mode, callbacks during motion are responded to according to the lookahead logic.
7. The next step can go to any line and execute the instruction literally. RL programs only process "program commands", without distinguishing between motion commands and logic commands.
8. When the robot pauses on the turning zone in Continuous Mode, the next step will go back to the target point corresponding to the current turning zone.
8.16.2.5 Step back debugging
Step back debugging, also known as previous step debugging, allows you to revert directly to the last correct position when a path error is detected during debugging, eliminating the need for multiple JOG operations to exit the erroneous trajectory and thereby improving debugging efficiency.
Non-motion commands typically will be skipped and do not take effect during the step back process
Force control commands, motion setup commands, and logic commands will stop the step back process.
8.16.2.6 Step back use
xCore supports switching directly to Step Back or Step Back from the PPTO (Point-to-Point Operation) cursor after pausing
When performing the first Step Back motion after positioning the PPTO cursor, since there is no trajectory information available, the Cartesian point will be forcibly converted to a MoveJ motion.
Operation |
Graphical Representation |
Explanation |
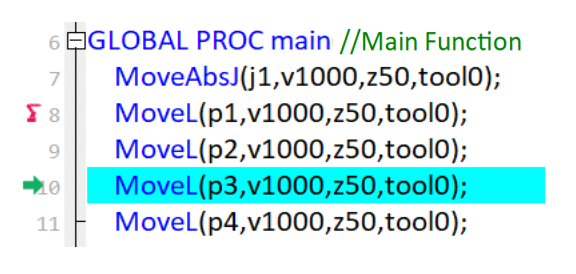
1. Pause during execution. |
|
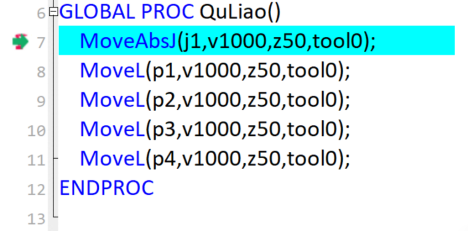
The lookahead has reached line ten, but the robot is still on the trajectory from J1 to P1 |
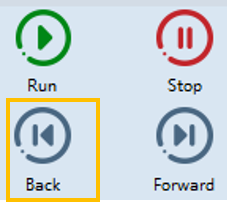
2. Click the Previous Step button on the right-side operation panel. |
|
The lookahead pointer will jump to the motion pointer, indicating that the system has entered step back mode |
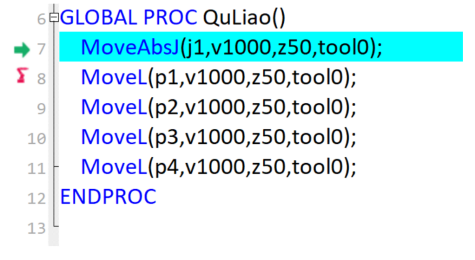
3. Upon clicking the Previous Step button again, the robot begins the step back motion. |
|
The robot will revert along the same path it was following at the time of pause (in this case, a MoveL motion) back to point J1 as indicated by the lookahead pointer |
8.16.2.7 Step back use restrictions
The step back function is primarily used for debugging points, so most non-motion commands are either ineffective or restricted during step back mode. Additionally, a few motion commands cannot be stepped back due to their inherent nature and are also restricted. If an attempt is made to step back through restricted commands, the controller will report an error.
For example:
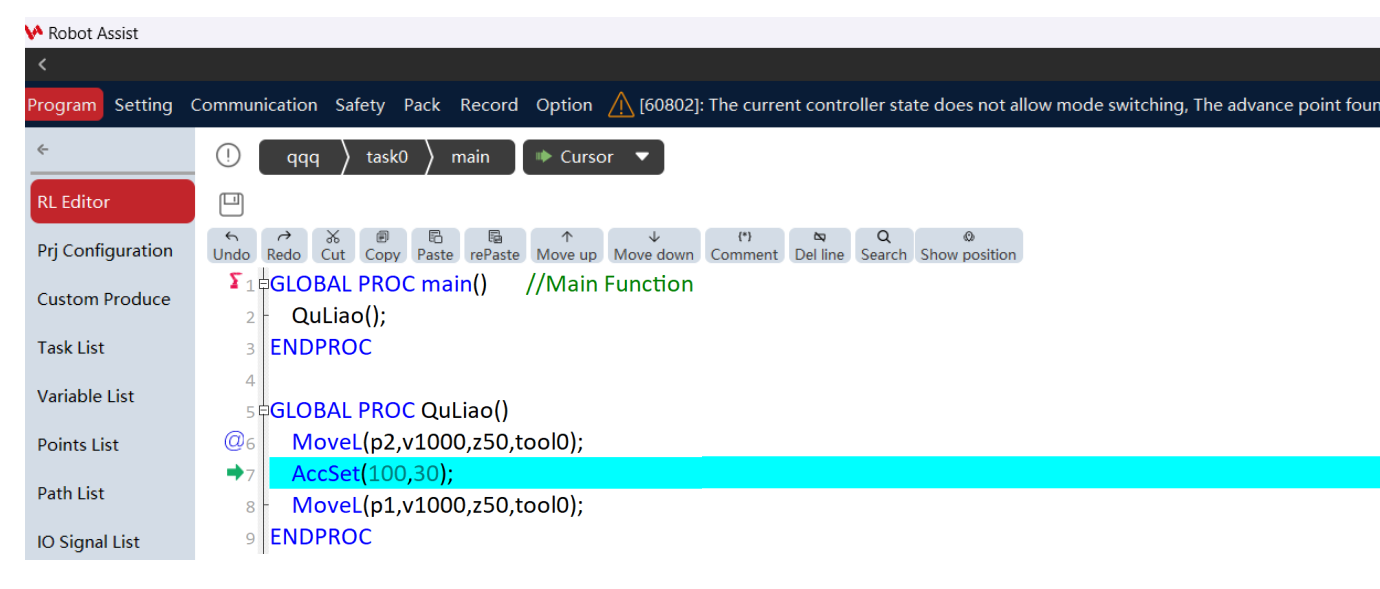
Supported commands for step back debugging:
Type |
Specific Commands |
Supported motion commands |
MoveAbsJ, MoveJ, MoveL, MoveC, Home |
Special motion commands |
SearchL, SearchC, TrigL, TrigJ, and TrigC (Note 1) |
Unsupported motion commands |
MoveSP, MoveT, MoveCF |
Non-motion commands that terminate step back |
Conveyor commands, force control commands, logic commands, function calls, advanced commands (Note 2) |
Skipped non-motion commands |
All other non-motion commands |
Note 1: Function such as search and Trig do not take effect during step back; they only produce motion effects.
Note 2: Commands such as GetRobotState, BreakLookAhead, and GetRobotMaxLoad will be skipped. All other commands in this category will terminate the step back process.
8.16.2.8 Regain path
In some specific situations, the robot’s position will deviate from its programmed path, for example:
During the period when the program is stopped (except for program stop caused by program reset), the robot is moved to another position by Jog;
The emergency stop is triggered when the program runs, and the robot executes STOP 0;
When the program starts again from the stop position, if the system detects that the robot has deviated from the programmed path, the robot will then first perform a Regain Path motion to return to the original programmed path.
To ensure safety, the movement speed of the robot is slower when returning to the programmed path, and the movement of the robot can be stopped at any time by pressing the "Stop" button on the Teach Pendant.
Use restrictions
1. The robot performs a joint trajectory when returning to the path, so the path of the end-effector is unpredictable. Please monitor for potential collisions with the surrounding environment.
2. The control system will only perform path deviation detection when the robot resumes program execution from the point where it was previously interrupted. If a deviation is detected, the system will execute the Regain Path operation.
3. If the program is reset, the system will not check for path deviation and will start execution directly from the first program line. Take precautions to prevent potential collisions.
8.16.2.9 Loop mode
Click the "Loop mode" button to switch to  loop mode or
  single mode.
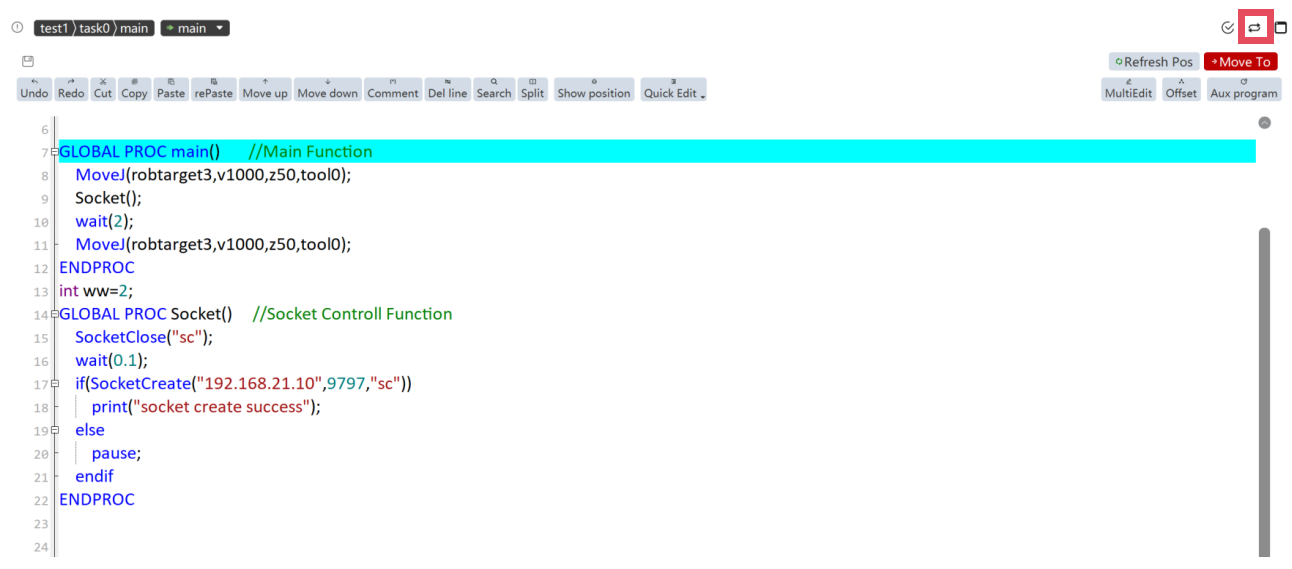
Loop mode:
All tasks are reset after 0.5s when they reach the endproc of the specified function (default is the Main function), and restart execution from the first line of the last specified function.
PPToMain operation takes the main function as the specified function;
PPToFunc takes the jump objective function as the specified function;
PPToLine does not affect the execution target of the function in the next loop.
Single mode:
All tasks (excluding semi-static tasks) are stopped permanently upon execution to the specified function (default is the Main function), until the project is reloaded next start.
8.16.2.10 Lookahead mechanism
8.16.2.10.1 Basic concept
The lookahead mechanism cannot be turned off. The system automatically looks ahead when running the program. You can use the Program
Pointer to view the lookahead position. From a lookahead perspective, RL commands can be divided into four categories: motion commands, non-stop lookahead commands, turning zone execution commands, and stop lookahead commands.
8.16.2.10.2 Motion commands
The commands that control the robot to produce actual motion effect are shown in RL programming commands for details, in which all "Motion commands", "Trigger commands", "Drag and replay commands" and "Home" commands belong to the classification of motion commands.
8.16.2.10.3 Non-stop lookahead commands
The command is executed immediately after the lookahead pointer is parsed, and then the lookahead pointer continues to run downwards to parse the next command, without affecting the turning zone between the two motion commands.
Non-stop lookahead commands: Print command, logical judgment command, variable assignment operation, user-defined function, collision detection dynamic threshold command, and motion parameters dynamic modification command;
Example:
MoveL (p1); IF (condition_1) Print (“meet condition 1”); MoveL (p2); ENDIF MoveL (p3); |
By running the above program, if condition 1 is met, the robot will plan a continuous trajectory motion of p1 > p2 > p3, and print the string "meet condition 1" when looking ahead to the print command.
In the case where condition 1 is not met, the robot will plan a continuous trajectory motion with p1 > p3.
8.16.2.10.4 Turning zone execution commands
The turning zone command is executed when the preceding motion command either enters the turning zone or completes its execution.
It is used to send a signal to the external device during the movement, indicating which motion commands the robot has moved to.
Turning zone execution commands: WriteRegByName, SetDO, SetGO, SetAO, PulseDO, PulseReg, InZone, SetVarValue, SpeedRefrsh, MotionSup, and MotionSupPlus.
Example:
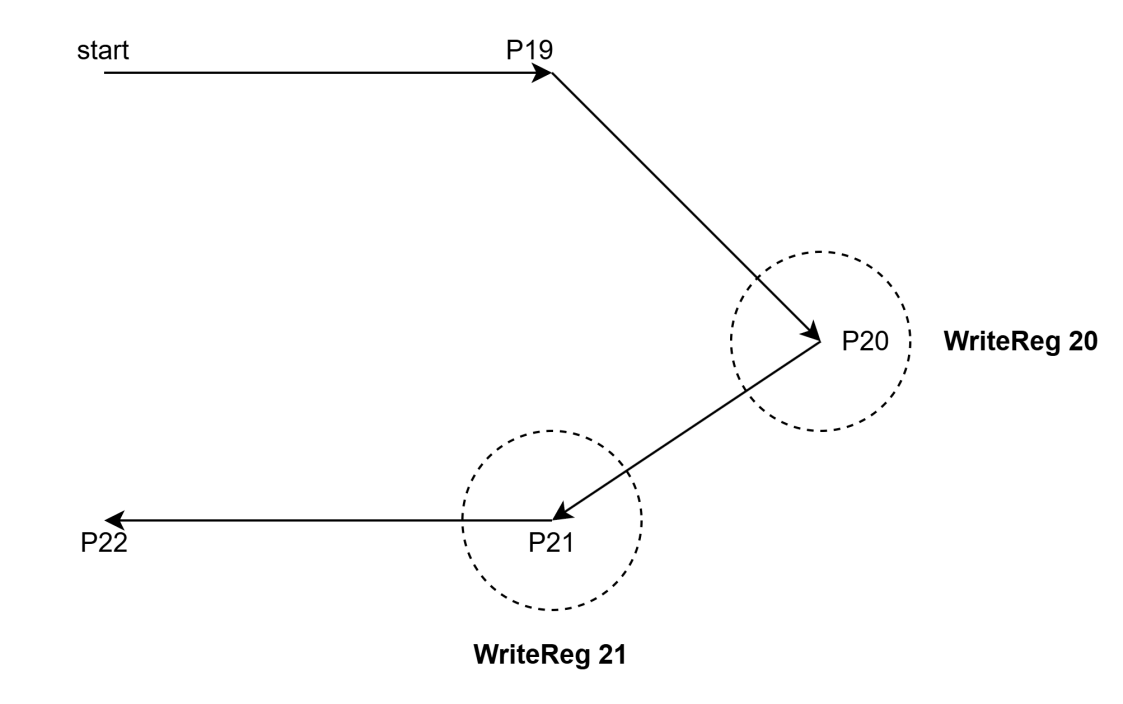
MoveL P19 MoveL P20 WriteRegByName (reg_position, 20); MoveL P21 WriteRegByName (reg_position, 21); MoveL P22 |
When the above motion commands are executed, the robot will plan a continuous motion trajectory of P19 > P20 > P21 > P22. As the robot is about to complete the P20 motion and enters the turning zone from P20 to P21, it will immediately write the number 20 into the register reg_position. Similarly, when the robot is about to complete the P21 motion and enters the turning zone from P21 to P22, it will immediately write the number 21 into the register reg_position. External devices can track the robot’s motion progress by simply reading this register.
|
The triggering time of the turning zone commands is affected by the performance of the robot itself, the size of the turning zone, whether the turning zone is generated, and the actual running speed. It is suitable for the scene where the robot is ready to move. If it is required to trigger the signal accurately at a certain position of the trajectory, it is necessary to use trigger series commands. If there is no turning zone or if a turning zone cannot be generated, the associated command will be triggered after the corresponding motion command is completed. |
8.16.2.10.5 Stop lookahead commands
Except for the above three commands, all the other commands are stop lookahead commands, and the controller will execute the commands after the robot completes all the movements before the commands.
Example:
MoveL (P1); MoveL (P2); Wait (10); MoveL (P3); |
The Wait commands belong to the stop lookahead command. The robot will move to P2 and start waiting for ten seconds after the deceleration stop is completed, and it will start to go to P3 after the waiting is completed.
When a motion command uses a Fine turning zone, the lookahead pointer in the RL program will stop at that line and wait for the movement to complete before continuing with lookahead
Example:
MoveAbsJ (j1, v1000, z50, tool0); MoveL (p1,v1000, z50, tool0); MoveL (p2,v1000, Fine, tool0); MoveL (p3,v1000, z50, tool0); |
8.16.2.11 Interrupt function
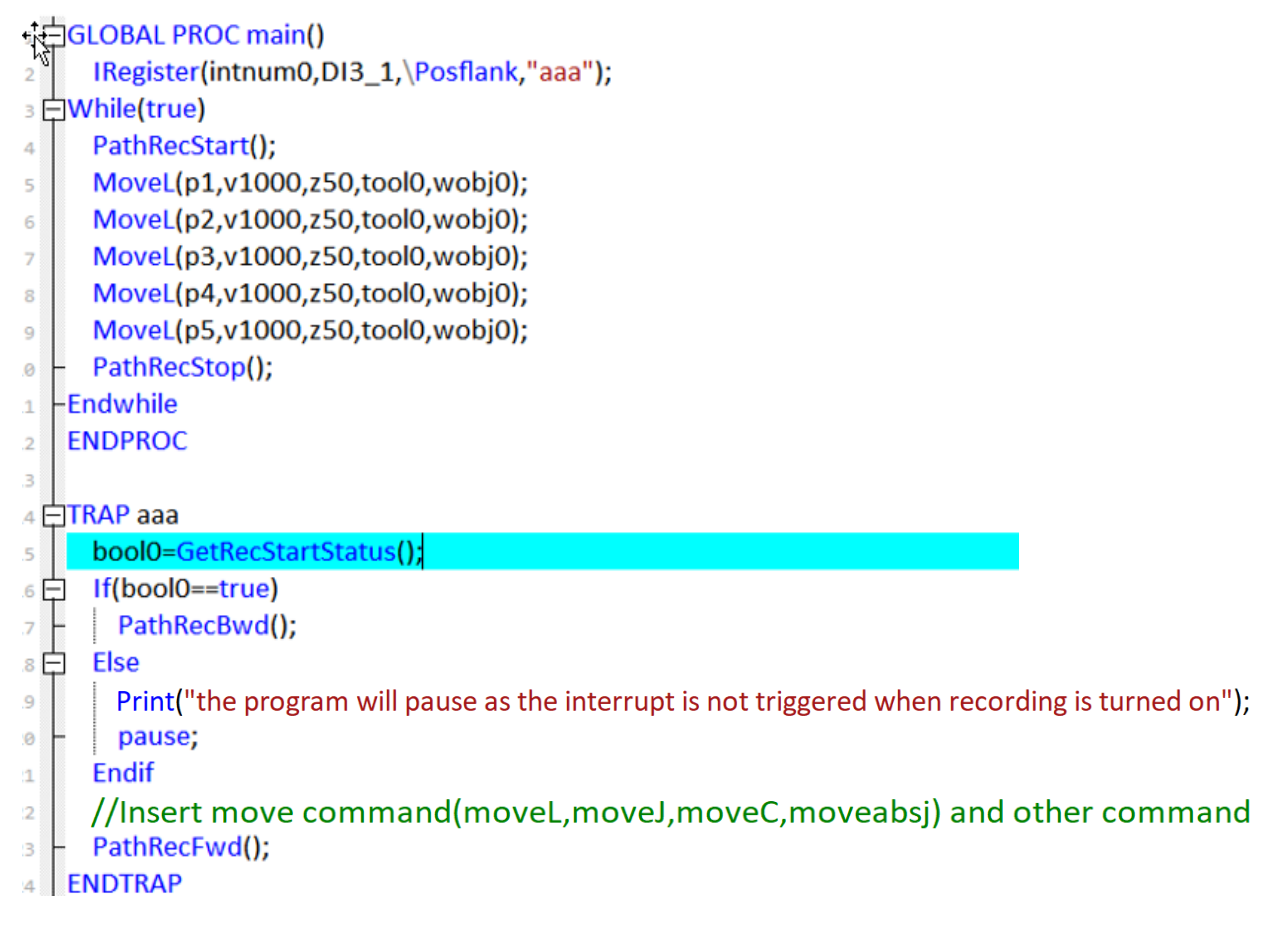
The interrupt function can be triggered by a DI signal or a register, interrupting the current program execution to run an interrupt function. Key features and considerations of the interrupt function are as follows:
1. The interrupt function can interrupt motion commands, persistent commands (network/communication read commands, connection acceptance commands,
SocketCreate, opendev, SocketClose, CloseDev, SendString, SendByte), and ordinary commands (type conversion, string operations, and other instantly completed commands).
2. If an interrupt occurs during the execution of a motion command, the current motion will stop, and the interrupt function will execute instead. After the commands inside the interrupt function are completed, the robot will return to the original path and resume execution. The regain path operation after the interrupt function is not part of the interrupt. The regain path function performs motion in joint space. It is recommended to use path recording commands in the interrupt function to ensure the robot correctly returns to a safe position.
3. Except for waituntil, other persistent commands are not truly interrupted; instead, they are moved to background execution. Error handling and task wake-up for these commands will be delayed until the interrupt ends. If a wait command is executed during an interrupt and the wait time expires after the interrupt ends, execution will proceed.
4. During an interrupt, register-read commands and external signal-control commands behave the same as in continuous motion, while register-write and external signal-monitoring commands remain responsive. Pause, emergency stop, and collision can halt interrupt execution. Single-step operation is allowed during an interrupt.
5. Interrupt-related commands can only be used in motion tasks, and only motion tasks can execute interrupts.
6. Interrupts cannot be used while entering force control mode. Once an interrupt is registered, force control mode cannot be initiated with FcInit.
7. For an interrupt configured with single-trigger mode, if it receives an interrupt signal after being disabled by IDisable, it will still be treated as completion of the single trigger
8. After an interrupt is registered with IRegister, it remains triggerable. However, when the task ends or resets, the registered interrupt is canceled until IRegister is executed again.
9. If an interrupt is already being executed, newly triggered interrupts will not be acknowledged.
10. When a task is executing an interrupt, or when normal operation resumes (due to either manual start command or interrupt exit triggering scheduler reset), the system will neither acknowledge new interrupts nor halt the current task.
11. Within interrupt functions, no interrupt-related commands (except GetTrapData) or tray stacking configuration commands can be called. Interrupts are prohibited when: laser welding is active, conveyor startup commands are executing, or end-effector motion commands are in progress — special attention must be paid when using these features.
12. If an interrupt occurs during drag playback, playback will not resume after the interrupt.
8.16.2.12 Pointer hot update
In versions of xCore 3.1 and earlier, any modification (even adding just a single space) to the RL program during debugging would result in the loss of the program pointer (including the lookahead pointer and motion pointer), requiring the program to be re-run from the beginning, which caused significant inconvenience for debugging.
From version 3.2, the pointer hot update has been provided. This function enables the editing of the RL program during the pause of debugging, while maintaining the current program pointer and call relationship. After editing, the program continues to be executed rather than running from the beginning. Specifically, it has the following two features:
-
When the robot is paused, the RL program can be modified without the loss of the program pointer (lookahead pointer and motion pointer).
-
After the editing is completed, the robot continues to execute the program based on the update.
This function significantly enhances the usability and efficiency of debugging, preventing the program from running from the beginning due to minor modifications.
Usage examples:
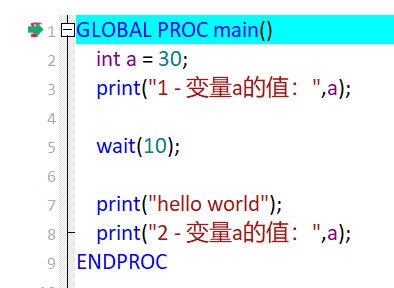
Assuming that the original RL program is as follows:
-
Click "Run", and then "Pause" when the program reaches line 5.
-
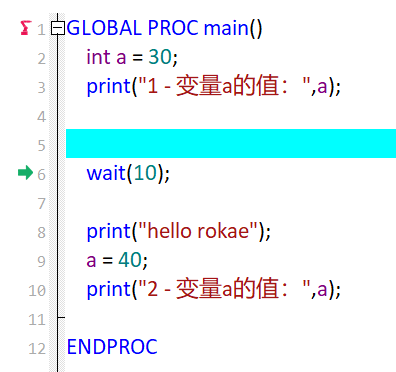
Modify the program as follows:
-
Click "Run", and the program will continue to execute, with the output result as follows:

-
It can be seen that the program continues to execute from the original pointer position after modification, and the running result is correct. There is no need to run from the beginning.
Notes:
-
Program validity: It is essential to ensure the correctness of the syntax when the program is modified after pausing. If the program is invalid, after clicking "Run", the Teach Pendant will report an error. Please correct it according to the prompt and then run it again.
-
Scope of code validity: Only the lines of code scanned by the lookahead pointer are valid in this run. If the code before the pointer is modified after pausing (e.g., lines of code before line 5 in the example), the modification will be valid in the next run.
-
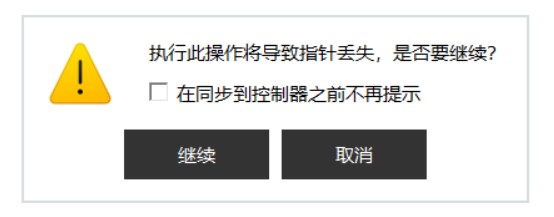
Modifying the line where the pointer is located: If you modify the code on the line where the pointer is located, the Teach Pendant will prompt: "This operation will result in the loss of the pointer. Do you want to continue?" If you choose "Continue", the pointer will be lost, and the hot update will not be available. If you choose "Cancel", the modification will be canceled.
-
Special cases: In certain situations, pointer hot update may not be possible, and the Teach Pendant will report an error. In this case, you need to manually click "pptomain" to restart the program.

8.16.3 Debugging example
Operation |
Graphical Representation |
Explanation |
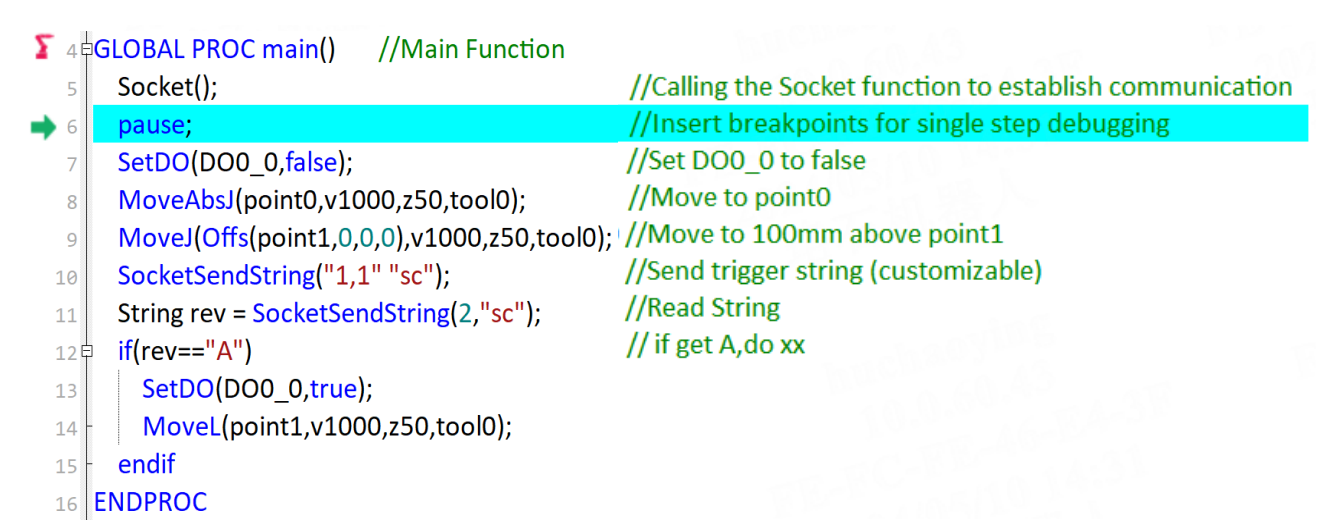
1. After editing the RL program, use pptomain to move the pointer to the main function, and check the program for syntax errors. |
|
To facilitate single-step debugging, pause command can be inserted into the program. |
2. Switch the mode to "manual mode", power on the robot, and adjust the program speed to a small value to make the robot run at a low speed. |
|
|
3. Click the "Start" button on the right operation panel. |
|
|
4. When the program runs to pause, it will pause until the "Next" button or the "Start" button is clicked. |
|
The "Next" button will single-step the program |
5. Click the "Next" button to start single-step debugging. |
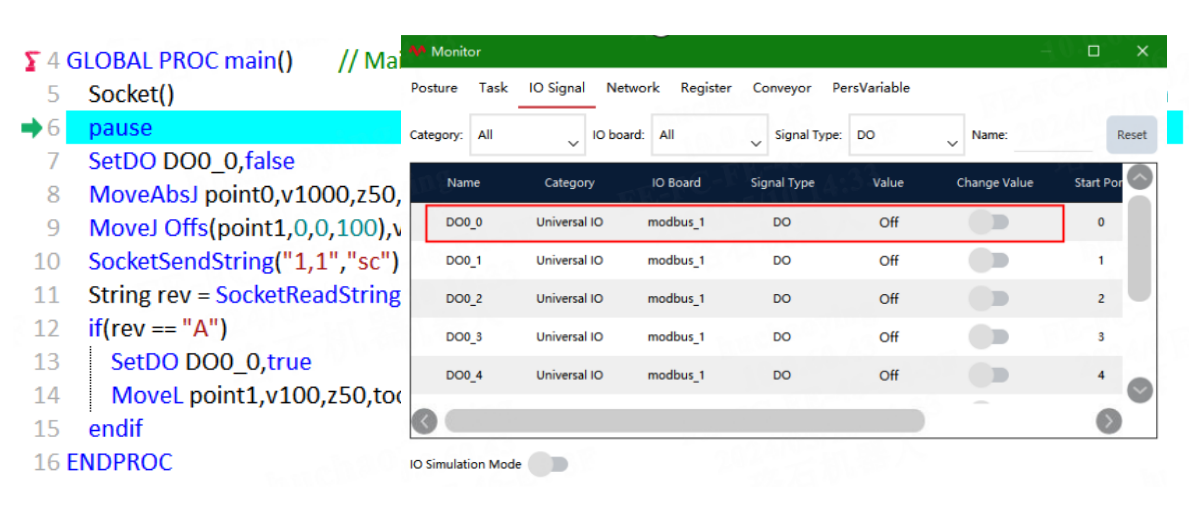
|
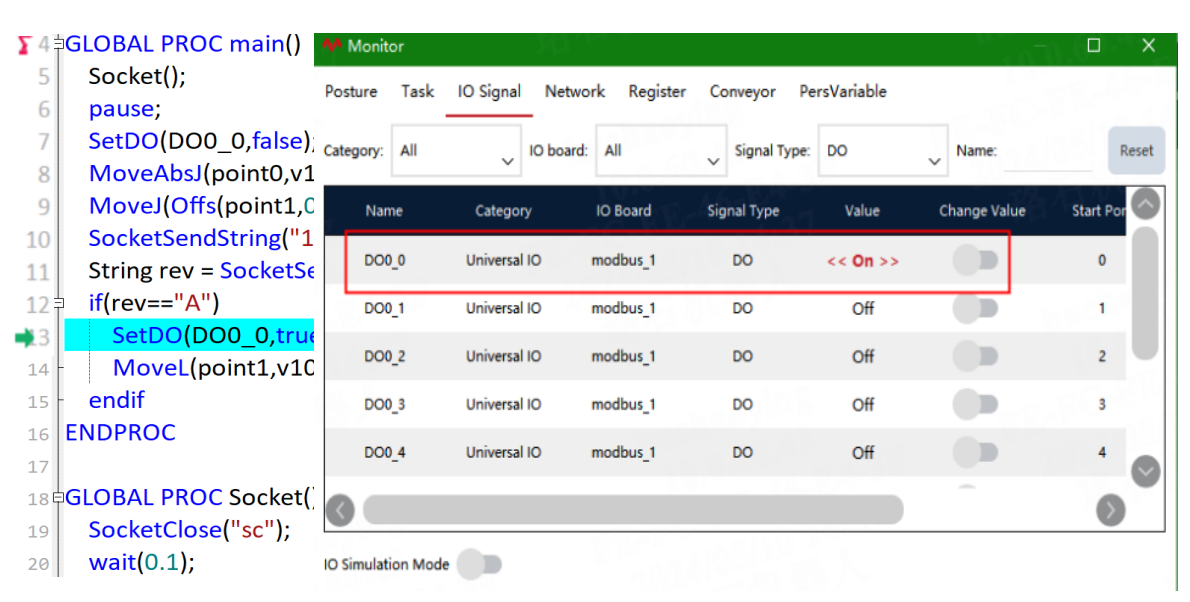
Run the program to the SetDO line, turn on status monitoring, and check if the DO is in the "off" state |
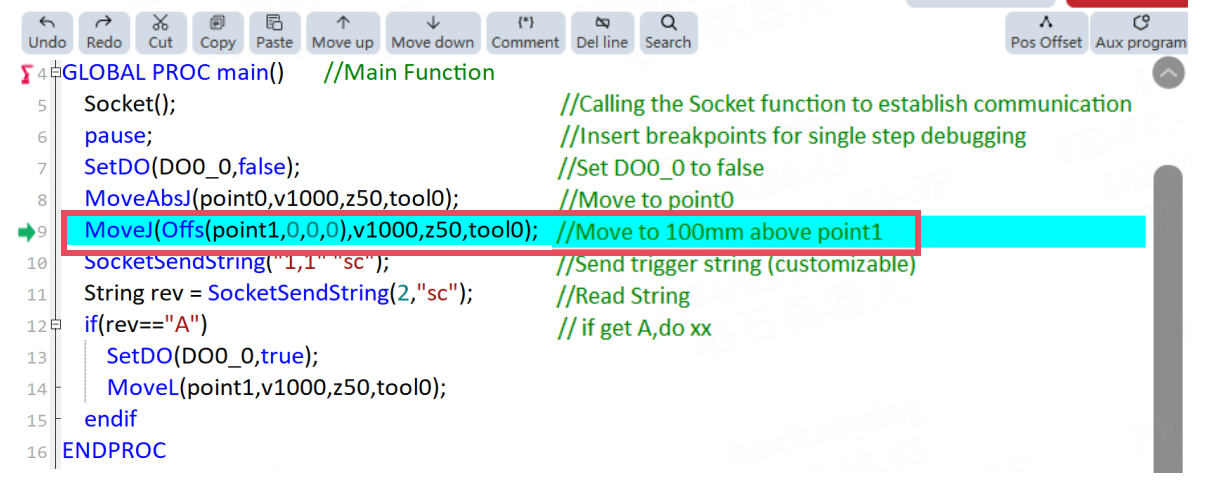
6. Continue to carry out single step to see if the robot has reached the desired point position. |
|
|
7. Or move the cursor to a certain line, and click the "Next" button to check if the command runs successfully. |
|
Run the program to the SetDO line, turn on status monitoring, and check if the DO is in the "on" state |
8. After confirming that there are no issues with the program, execute pptomain again and keep the "program speed" low. After running it completely once, the program speed can be increased, and the program can be switched to "automatic mode" to execute. |
|