9.3.1 Basic settings


① |
Language: Chinese, English, Japanese, Korean, and Russian are supported. |
② |
Bind IP address: The robot detection function of "Options − Connections" can set whether to perform detection through a fixed PC-side IP here. |
③ |
Refresh interval: the refresh rate of the 3D display page of status monitoring, with the upper limit is 100 Hz, and the default is 18 Hz. |
④ |
Turn off the 3D display: Turn off the 3D display for status monitoring, and restart takes effect. |
⑤ |
Timeout logout for permissions: After a certain period of inactivity, the logged-in administrator will automatically log out. The default set timeout is 10 minutes; setting this value to 0 disables this feature. |
⑥ |
View position parameters: In the RL programming interface, this function allows viewing the point position accuracy parameter. It supports fuzzy queries within an angular range, with a default tolerance of 1°. |
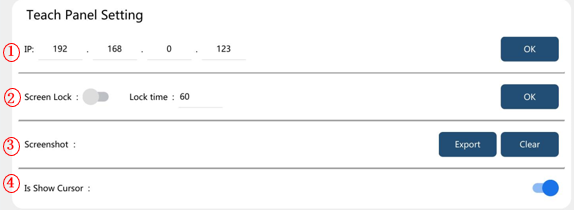
① |
IP (only for xPad2): Set the static IP address for the Teach Pendant connected to the robot. |
② |
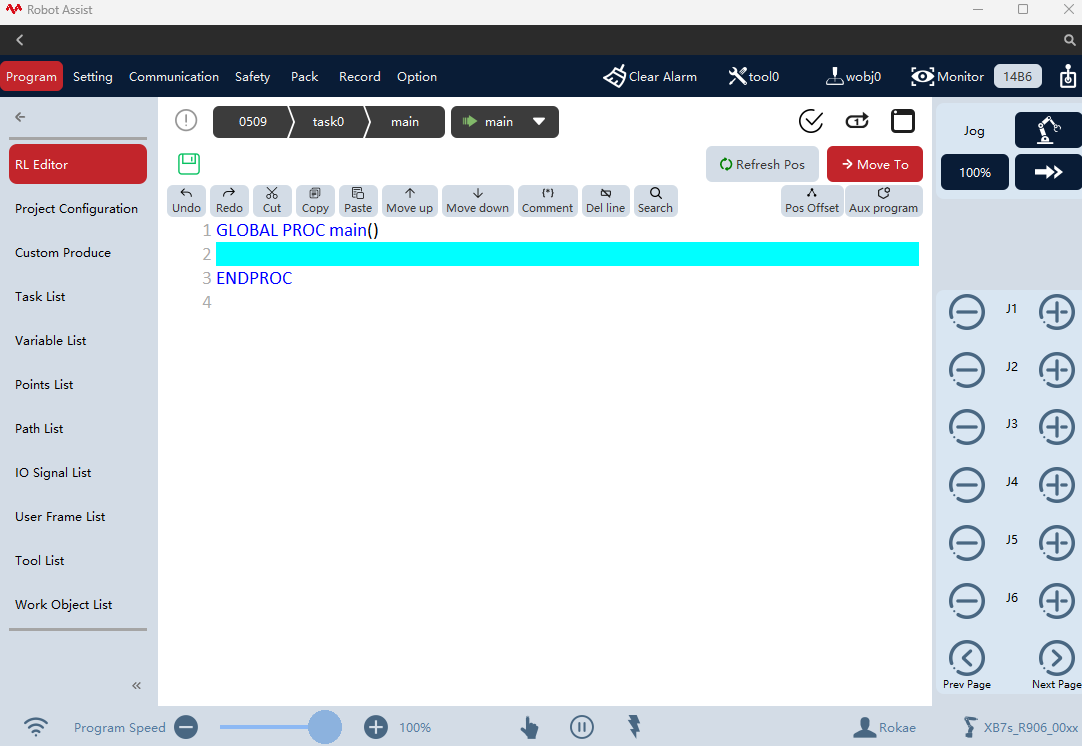
Lock screen (only for xPad2): Reduce the accidental touch of Teach Pendant by unrelated personnel. After turning on this function, if the Teach Pendant is not operated for a period of time (idle time), or after clicking the lock screen shortcut key, the Teach Pendant will enter the lock screen state, similar to the picture below: |
③ |
Screenshot (only for xPad2): Take a screenshot of the Teach Pendant screen and save it in the Teach Pendant directory. The picture format is JPG. |
④ |
Cursor displayed or not: Whether the Teach Pendant cursor is set. |
① |
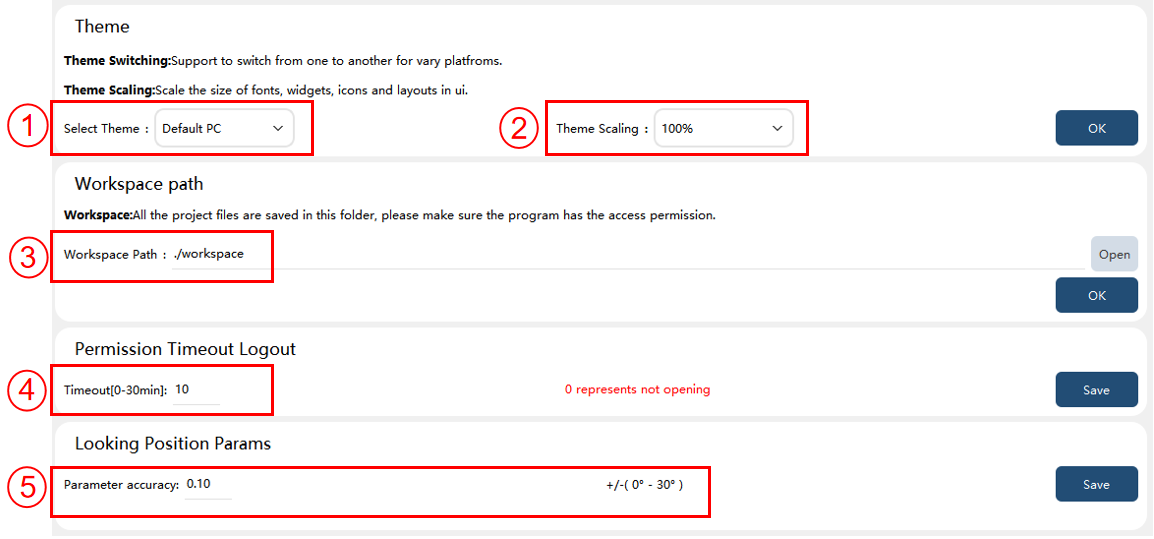
Choose a theme: Choose a different display style; |
② |
Theme size: Adjust the size of controls and fonts; |
③ |
Workspace directory: Set the folder to save project files. |
④ |
Timeout logout for permissions: When there is no activity on the interface for longer than the set timeout period, the user permission will be switched to Operator |
⑤ |
Point position accuracy: Set the point position accuracy |
① |
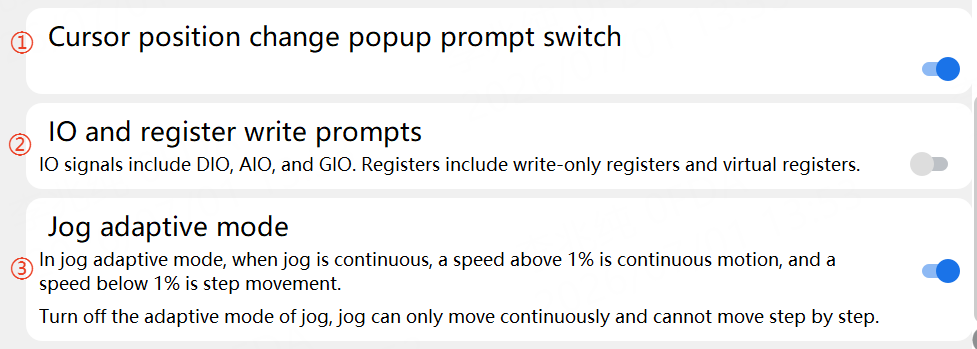
Cursor position change prompt switch: It is on by default. After this switch is turned on, a pop-up message will appear when clicking "pptoline" if the cursor position is inconsistent with the lookahead pointer position. Click "Confirm" to execute "pptoline" to the line where the cursor is located; click "Cancel" to stop the "pptoline." |
② |
IO and register write prompt: It is on by default. After it is turned on, a pop-up message will appear when modifying the values of the IO or register via the status monitoring page, custom production page, or custom button. Click "Confirm" to modify the values of the IO and register; click "Cancel" to keep the values of the IO and register unchanged. |
③ |
Jog adaptive mode: It is on by default. When it is turned on, the jog is continuous at speeds above 1%, and step by step at speeds of 1% or below. When it is turned off, the jog is continuous at speeds from 0.1% to 100%. |
9.3.2 Teach Pendant mode
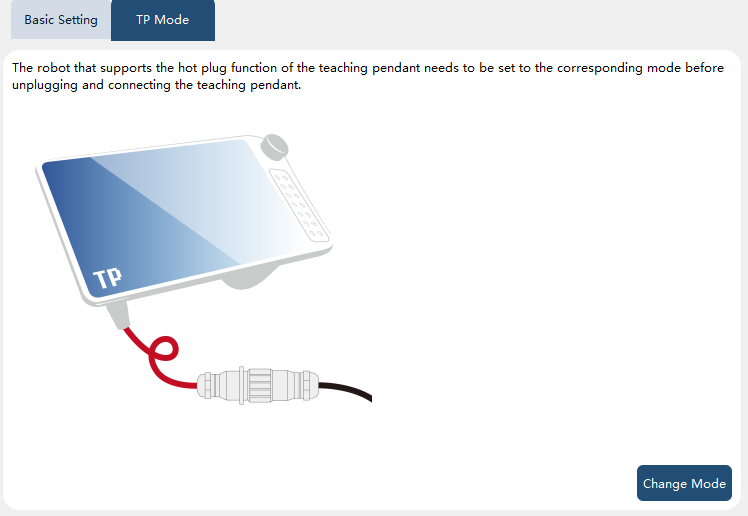
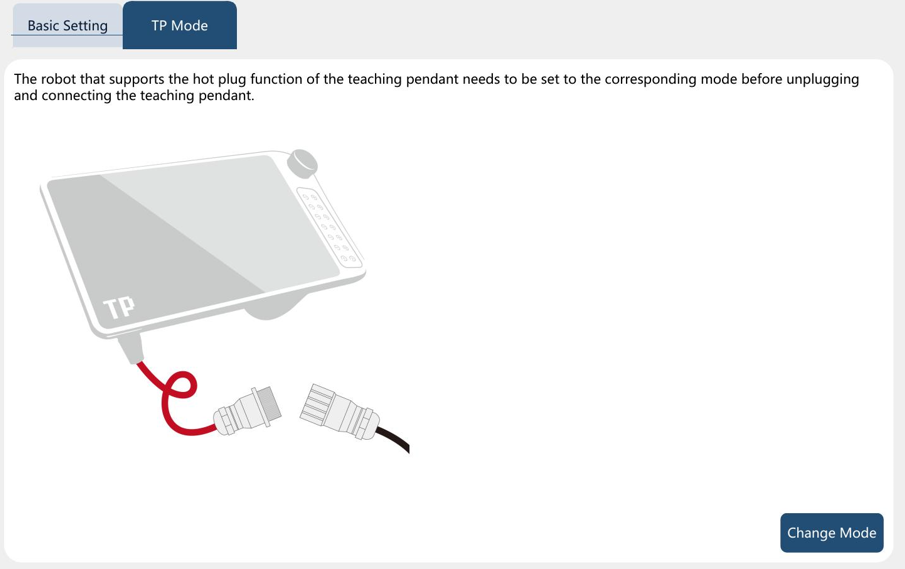
When the robot is turned on and used, it may be necessary to disconnect the physical connection between the xPad2 Teach Pendant and the robot. If the physical connection is directly disconnected, the robot will enter an emergency stop state. If you want not to affect the normal operation of the robot, you can follow the following steps.
| Step | Graphical Representation | Explanation |
|---|---|---|
1. The current mode of the Teach Pendant is displayed on this page, which defaults to "Teach Pendant mode". Click the "Switch mode" button to switch to "No Teach Pendant mode". "No Teach Pendant mode" will be displayed on the interface after a successful switch. |
|
|
2. After switching to "No Teach Pendant mode", the physical connection of the demonstrator xPad2 to the robot can be disconnected. (Refer to the section "Robotic system composition and connections".) |
At this time, the robot will not enter an emergency stop state. |
To reconnect the Teach Pendant xPad2 to the robot, follow the steps below:
| Step | Graphical Representation | Explanation |
|---|---|---|
1. Establish a physical connection between the Teach Pendant xPad2 and the robot. (Refer to the section "Robotic system composition and connections".) |
||
2. The "No Teach Pendant mode" is currently displayed on this page. Click the "Switch mode" button to switch to "Teach Pendant mode". "Teach Pendant mode" will be displayed on the interface after a successful switch. |
|
|
|
9.3.3 RL editor menu
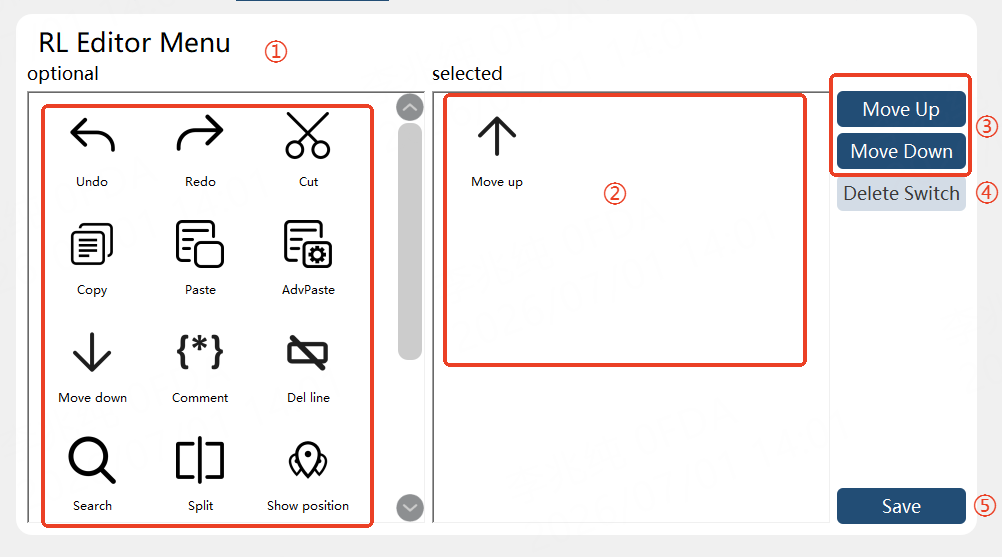
① |
Optional menu: click the item to add it to the right side. |
② |
Selected menu: By default, click the item to highlight it, rather than removing it. To remove an item, first click the "Delete" button, and then click the item to remove it and return it to the optional menu area. |
③ |
Move up/down: Adjust the order of the currently selected menu item. |
④ |
Delete button: When enabled, clicking a selected menu item will remove it. When disabled, clicking a selected menu item will only highlight it without removal. |
⑤ |
Save: The configuration takes effect immediately upon saving, which can be viewed in the RL editor. |
9.3.4 Quick insert command
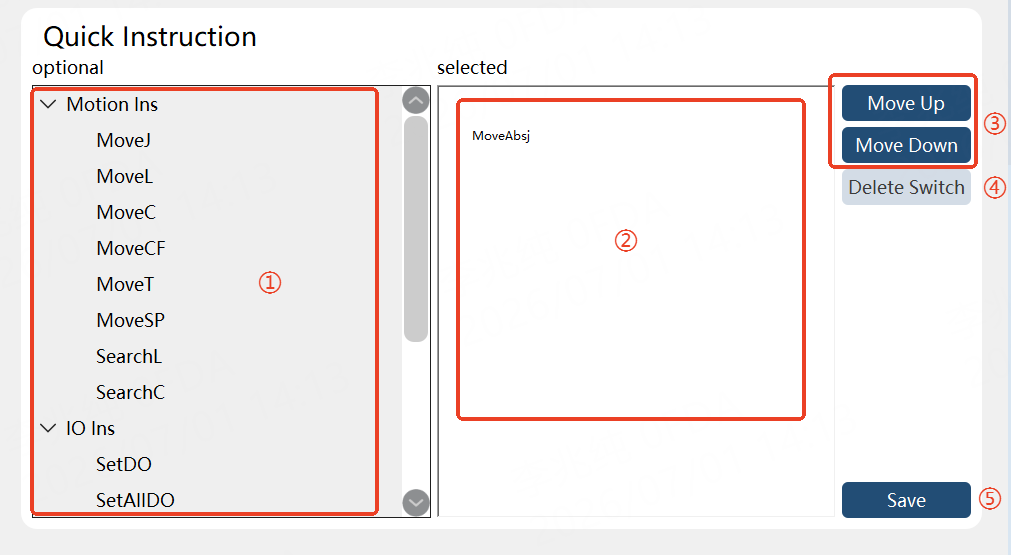
① |
Optional quick insert command: Click the command to add it to the selected command area. |
② |
Selected quick insert command: Click the command to highlight it. To remove a command, first click the "Delete" button to enter deletion mode, and then click a selected command to remove it and return it to the optional command area. |
③ |
Move up/down: Adjust the order of the currently selected command. |
④ |
Delete button: When disabled, clicking a selected command will only highlight it without removal. When enabled, clicking a selected command will remove it. |
⑤ |
Save: The configuration takes effect immediately upon saving, which can be viewed under Auxiliary programming -> Quick insert. |
9.3.5 General command
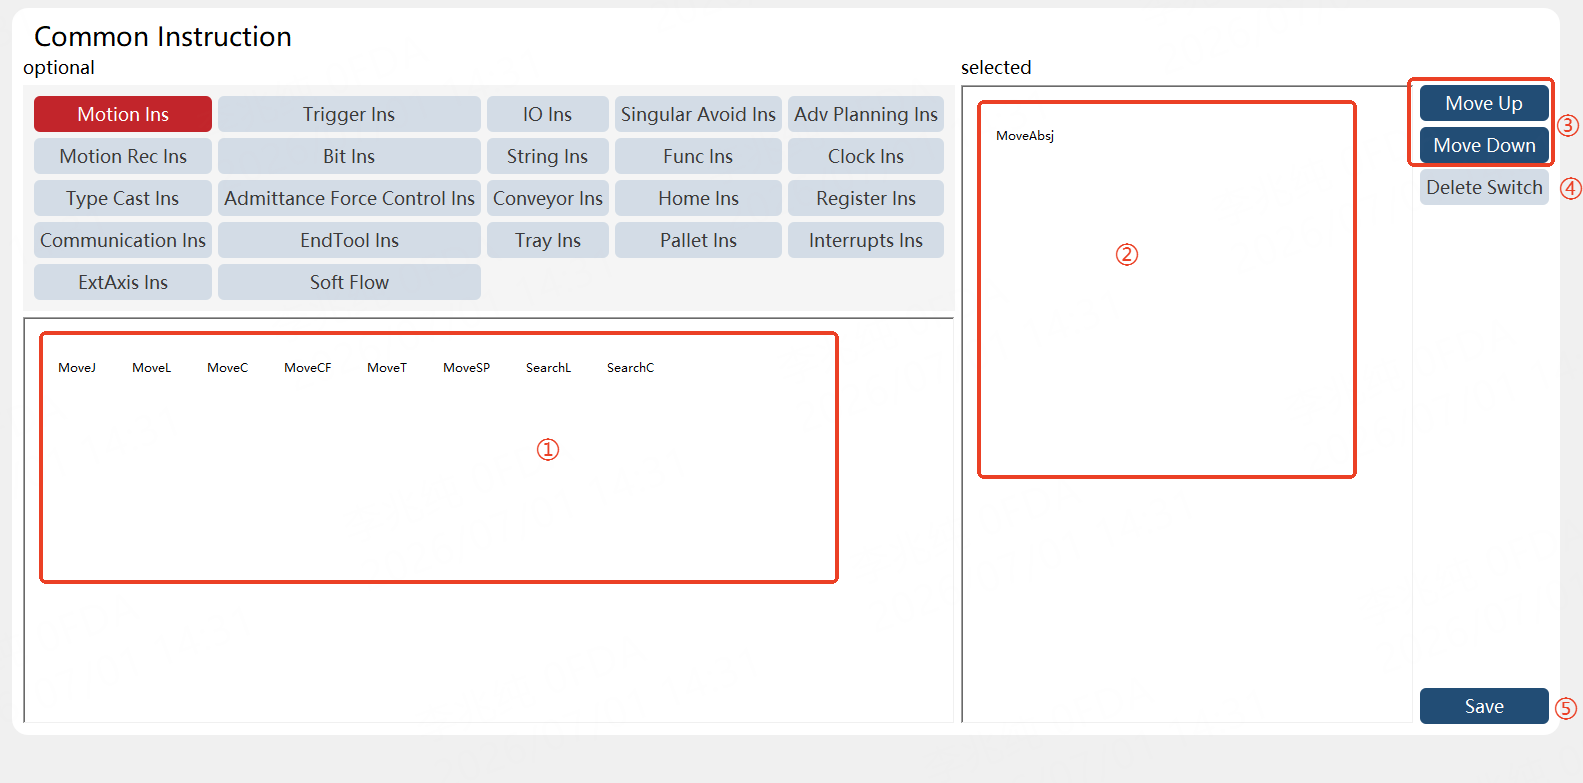
① |
Optional command: Click the command to add it to the selected command area. Switching between groups is available at the top. |
② |
Selected command: Click the command to highlight it. When the "Delete" button is enabled, clicking a selected command will remove it. |
③ |
Move up/down: Adjust the order of the currently selected command. |
④ |
Delete button: When enabled, clicking a selected command will remove it. |
⑤ |
Save: The configuration takes effect immediately upon saving, which can be viewed under Auxiliary programming -> Quick insert command -> General command. |