16.1 Details of user permission
Category |
Function |
Operator |
Teacher |
Programmer |
Admin |
System |
Project related and program editing |
Project configuration (create, import, export, load, restore, save as, set default project) |
N |
N |
Y |
Y |
Y |
View project (including program and object data such as IO, variables, and predefined parameters) |
Y |
Y |
Y |
Y |
Y |
|
Edit project (including object settings such as program editing and tools) |
N |
N |
Y |
Y |
Y |
|
Teach point positions (including RL editor interface, variable list point type, point list) |
N |
Y |
Y |
Y |
Y |
|
Robot motion and program running |
Switch between automatic/manual mode |
Y |
Y |
Y |
Y |
Y |
Power on/off |
Y |
Y |
Y |
Y |
Y |
|
Start/Stop program |
Y |
Y |
Y |
Y |
Y |
|
Switch program loop mode |
Y |
Y |
Y |
Y |
Y |
|
Adjust program running speed |
N |
Y |
Y |
Y |
Y |
|
Single-step program debugging |
N |
Y |
Y |
Y |
Y |
|
Jog/Drag the robot |
N |
Y |
Y |
Y |
Y |
|
Status monitoring |
View runtime data |
Y |
Y |
Y |
Y |
Y |
Set IO Signal |
N |
Y |
Y |
Y |
Y |
|
Set register value |
N |
Y |
Y |
Y |
Y |
|
Variable monitoring |
N |
Y |
Y |
Y |
Y |
|
Setting |
Controller settings - basic settings |
N |
N |
Y |
Y |
Y |
Controller settings - advanced settings |
N |
N |
Y |
Y |
Y |
|
Controller settings - authorization settings |
N |
N |
N |
Y |
Y |
|
HMI settings - basic settings |
N |
N |
N |
Y |
Y |
|
HMI settings - Teach Pendant mode |
N |
N |
Y |
Y |
Y |
|
User group |
Y |
Y |
Y |
Y |
Y |
|
Zero calibration |
N |
N |
Y |
Y |
Y |
|
Calibration of the base frame |
N |
N |
Y |
Y |
Y |
|
Dynamic settings |
N |
N |
Y |
Y |
Y |
|
Body parameters |
N |
N |
Y |
Y |
Y |
|
Motion parameters |
N |
N |
Y |
Y |
Y |
|
Force control parameters |
N |
N |
Y |
Y |
Y |
|
Quick adjustment |
N |
Y |
Y |
Y |
Y |
|
Electronic nameplate |
N |
N |
Y |
Y |
Y |
|
Error code alarm filtering |
N |
N |
Y |
Y |
Y |
|
Custom buttons |
N |
N |
Y |
Y |
Y |
|
Communication |
System IO |
N |
N |
Y |
Y |
Y |
External communication |
N |
N |
Y |
Y |
Y |
|
IO device |
N |
N |
Y |
Y |
Y |
|
Bus devices |
N |
N |
Y |
Y |
Y |
|
Register |
N |
N |
Y |
Y |
Y |
|
End-effector |
N |
N |
Y |
Y |
Y |
|
RCI settings |
N |
N |
Y |
Y |
Y |
|
xPanel configuration |
N |
N |
Y |
Y |
Y |
|
Electric gripper and suction cup |
N |
N |
Y |
Y |
Y |
|
Serial port settings |
N |
N |
Y |
Y |
Y |
|
Encoder |
N |
N |
Y |
Y |
Y |
|
OPC-UA |
N |
N |
Y |
Y |
Y |
|
Process Package |
Conveyor belt |
N |
N |
Y |
Y |
Y |
Log |
Log query |
Y |
Y |
Y |
Y |
Y |
Diagnostic setting |
N |
N |
N |
N |
Y |
|
Options |
Connect/About/Demo |
Y |
Y |
Y |
Y |
Y |
Software upgrade - controller upgrade/other settings |
N |
N |
N |
Y |
Y |
|
Software upgrade - HMI upgrade/controller backup |
Y |
Y |
Y |
Y |
Y |
|
Export |
Y |
Y |
Y |
Y |
Y |
|
Import |
N |
N |
N |
Y |
Y |
|
File manager |
N |
N |
N |
Y |
Y |
Introduction of collaborative robot’s end-effector handle
16.2.1 ER series
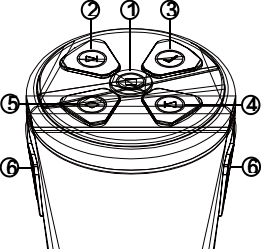
The xMate ER series robot end-effector integrates a Pilot handle with an intelligent interactive panel. In Drag Mode, the buttons on the Pilot handle can be used for quick point position teaching and continuous trajectory teaching, providing better human-machine interaction.
Definition of buttons on end-effector Pilot handle:
S/N |
Definition |
① |
It is used to update the teaching point with the current pose, start/stop trajectory recording |
② |
Next |
③ |
Add the midpoint/track to the list and confirm/cancel the pop-up prompt. |
④ |
Previous |
⑤ |
Delete the point position/trajectory in the list, cancel pop-up window prompts |
⑥ |
In Drag Mode, press the two enabling buttons at the same time to activate the drag function |
CR series
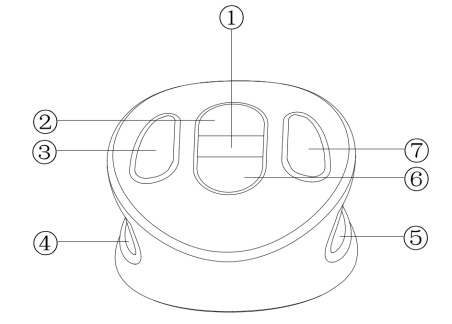
The xMate CR series robot end-effector integrates an xPanel handle with an intelligent interactive panel. In Drag Mode, the buttons on the Pilot handle can be used for quick point position teaching and continuous trajectory teaching, providing better human-machine interaction.
Definition of buttons on end-effector xPanel handle:
S/N |
Definition |
① |
Add the midpoint/track to the list and confirm the pop-up prompt |
② |
Move forward |
③ |
Delete the point/track in the list and cancel the pop-up prompt |
④ |
In Drag Mode, press the two enabling buttons at the same time to activate the drag function |
⑤ |
|
⑥ |
Move backward |
⑦ |
Update the teach point with the current pose, confirm the pop-up prompt, and start/stop trajectory recording. |
16.3 Point position and path teaching (based on the collaborative robot’s end-effector handle)
16.3.1 Point position teaching
Turn on the drag enabling switch on the operation panel, and the robot is powered on automatically and enables Drag Mode. The following operations can be performed through Robot Assist and the robot end-effector drag handle:
| Step | Explanation |
|---|---|
1. Create/load a project and enter the Point List interface; |
The end-effector buttons only respond when the current page of Robot Assist is Point List or Path List. |
2. Press the two enabling buttons on the end-effector handle at the same time, drag the robot to any position, and release the drag enabling button. Press the Add Point button on the end-effector handle. |
A new teaching point of the current pose is added to the end of the Point List, and the cursor is now at the new teaching point; |
3. Press the Previous/Next button on the end-effector handle |
Move the cursor to the previous/next point in the Point List and select the point; |
4. Select a point to update in the Point List, drag the robot to another position, and release the drag enabling button. Press the Update Point button on the end-effector handle; |
A pop-up window prompt will appear when you try to update a point position. If you press the OK button on the end-effector handle, the selected point position will be updated from the current pose. If you press the Cancel button on the end-effector handle, the pop-up window will be closed, and the selected point position will remain unchanged; |
5. Select a point to delete in the Point List. Press the Delete Point button on the end-effector handle and confirm. |
A pop-up window prompt will appear when you try to delete a path. If you press the OK button on the end-effector handle, the selected path will be deleted from the Path List. If you press the Cancel button on the end-effector handle, the pop-up window will be closed, and the selected path will remain on the Path List; |
16.3.2 Path teaching
Turn on the drag enabling switch on the operation panel, and the robot will be powered on automatically and enable the drag mode. Then, perform the following operations through Robot Assist and the end-effect drag handle:
| Step | Explanation |
|---|---|
1. Create/Load a project, move the robot to any start position, and enter the Path List interface. |
The end-effector buttons only respond when the current page of Robot Assist is Path List or Path List. |
2. Press the Add Path button on the end-effector handle; |
A new path is added to the end of the Path List, and the cursor is now at the new path; |
3. Press the Previous/Next button on the end-effector handle; |
Move the cursor to the previous/next path in the Path List and select the path; |
4. Select a path in the Path List to start recording. Press the Start Trajectory Recording button on the end-effector handle and press the two enabling buttons on the end-effector handle at the same time to drag the robot for trajectory recording. |
The trajectory recording starts after the Start Trajectory Recording button is pressed. Press the Stop Trajectory Recording button to stop recording, and the trajectory is saved automatically. |
5. Select a path to delete in the Path List. Press the Delete Path button on the end-effector handle and confirm. |
A prompt window will pop up when you try to delete a path. If you press the OK button on the end-effector handle, the selected path will be deleted from the Path List. If you press the Cancel button on the end-effector handle, the prompt window will be closed, and the selected path will remain on the Path List. |
16.4 OPC-UA Robotics model
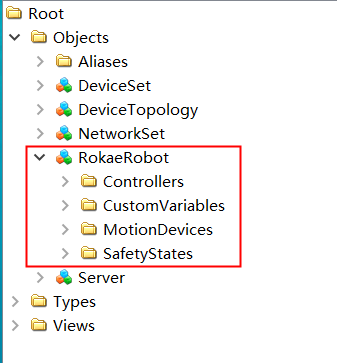
The OPC-UA server of the xCore controller system defaults to supporting all mandatory options specified in the standard of OPC 40010-1 OPC-UA for Robotics, Part 1: Vertical Integration. The top-level directory is as follows:
Type |
Browse Name |
Description |
MotionDeviceSystem |
RokaeRobot |
Each server has an instance of MotionDeviceSystem type, named "RokaeRobot", placed under the Objects node; |
The child nodes of MotionDeviceSystem are as follows:
Type |
Browse Name |
Description |
MotionDevices |
MotionDevices |
A container that can accommodate MotionDeviceType instances |
Controllers |
Controllers |
A container that can accommodate MotionDeviceType instances |
SafetyStates |
SafetyStates |
A container that can accommodate ControllerType instances |
CustomVariables |
CustomVariables |
A container that accommodates custom variables. This node is an extension of the Robotics standard model, and all user-defined variables can be found under this node |
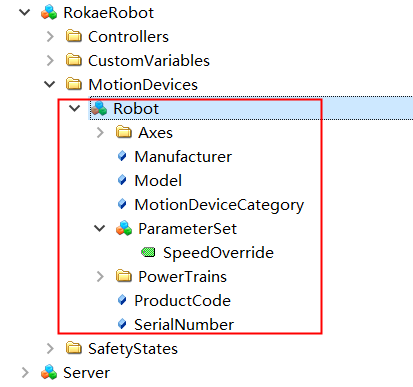
16.4.1 MotionDevices model
Type |
Browse Name |
Description |
MotionDevice |
Robot |
The instance of MotionDeviceType, named "Robot" |
The child nodes of MotionDevice are as follows:
Type |
Browse Name |
Description |
MotionDeviceCategory |
MotionDeviceCategory |
The type of motion equipment specified in ISO 8373, which is set to ARTICULATED_ROBOT, that is, joint robot |
Manufacturer |
Manufacturer |
Manufacturer |
Model |
Model |
Robot model |
ProductCode |
ProductCode |
Product number, currently not supported |
SerialNumber |
SerialNumber |
Serial number, currently not supported |
ParameterSet |
ParameterSet/SpeedOverride |
Program speed, RL program speed: 1−100% |
16.4.1.1 Axes child nodes

Type |
Browse Name |
Description |
Axis |
Axis%1 |
1. Each instance corresponds to an axis, and a 6-axis robot corresponds to 6 instances 2. Name according to axis number, such as Axis1, Axis2 |
The Axes child nodes are as follows:
Type |
Browse Name |
Description |
MotionProfile |
MotionProfile |
Axis type, generally: 1 (ROTARY) |
ParameterSet |
ParameterSet/ActualPosition |
Current axis position, in degrees |
ParameterSet/ActualSpeed |
Current axis speed, in degrees/s |
16.4.1.2 PowerTrains child nodes

Type |
Browse Name |
Description |
PowerTrain |
Motor%1 |
1. Each instance corresponds to an axis power unit, and a 6-axis robot corresponds to 6 instances, including 6 MotorType instances 2. Name according to axis number, such as Motor1, Motor2 |
Motor child nodes are as follows:
Type |
Browse Name |
Description |
Manufacturer |
Manufacturer |
Manufacturer, currently not supported |
Model |
Model |
Robot model, currently not supported |
ProductCode |
ProductCode |
Product number, currently not supported |
SerialNumber |
SerialNumber |
Serial number, currently not supported |
ParameterSet |
ParameterSet/MotorTemperatur |
Motor temperature, currently not supported |
16.4.2 Controllers model

Type |
Browse Name |
Description |
ContorllerType |
xCore |
1. Each robot contains an instance of ContorllerType, named xCore |
ContorllerType child nodes are as follows:
Type |
Browse Name |
Description |
Manufacturer |
Manufacturer |
Manufacturer |
Model |
Model |
Robot model |
ProductCode |
ProductCode |
Product number, currently not supported |
SerialNumber |
SerialNumber |
Serial number, currently not supported |
CurrentUser |
CurrentUser |
Currently not supported |
Software |
Software |
A container containing SoftwareType instances |
TaskControls |
TaskControls |
A container containing TaskControlType instances |
16.4.2.1 Software child nodes

Type |
Browse Name |
Description |
Software |
xCore |
xCore control system |
ContorllerType child nodes are as follows:
Type |
Browse Name |
Description |
Manufacturer |
Manufacturer |
Manufacturer |
Model |
Model |
Robot model |
SoftwareRevision |
SoftwareRevision |
Software version number, such as 2.1.2 |
16.4.2.2 TaskControls child nodes
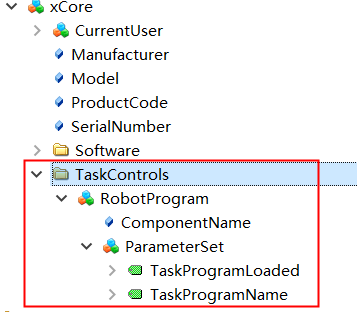
Type |
Browse Name |
Description |
TaskControl |
RobotProgram |
TaskControlType instance named RobotProgram |
ContorllerType child nodes are as follows:
Type |
Browse Name |
Description |
ComponentName |
ComponentName |
Null |
ParameterSet |
ParameterSet/TaskProgramName |
Display the current RL project name |
ParameterSet/TaskProgramLoaded |
If the project has been loaded, display true, and if there is no project, display false |
16.4.3 SafetyStates

Type |
Browse Name |
Description |
SafetyState |
SafetyState |
SafetyStateType instance named SafetyState |
SafetyState child nodes:
Type |
Browse Name |
Description |
ParameterSet |
ParameterSet/EmergencyStop |
Null |
ParameterSet/OperationalMode |
Operation mode, enumeration values: 0-Other, 1-Manual Reduced Speed, 2-Manual High Speed, 3-Automatic, 4-Automatic External At present, the manual and automatic modes in the control system correspond to 1 and 3 in the above enumeration values respectively |
|
ParameterSet/ProtectiveStop |
Internal safety gate stop and protection stop status of the controller |
